

Felynes in Monster Hunter: World are cat-like creatures that perform a variety of tasks. Some of them, called Palicoes, accompany you on Quests to slay Monsters.
Felynes are small bipedal cat creatures. They are sentient, and form small tribal communities in the wilderness but many felynes join human communities and usually work as servants, cooks and craftsmen. Felynes that accompany hunters are called Palicoes.
Palicoes |
|
|---|---|
 |
|
| Race | Felynes |
| Roles | Buffs, Debuffs, DPS, Gathering |
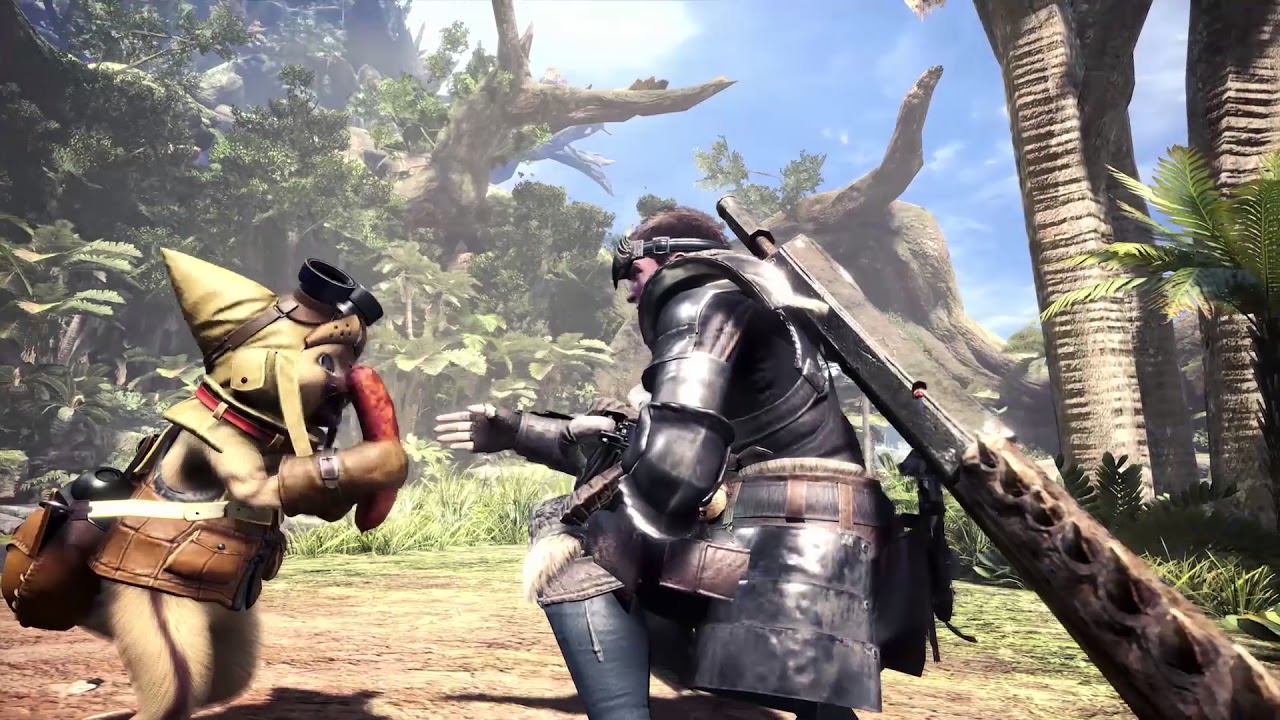
Palicoes are a cat-like combat companion in Monster Hunter World. As hunters' reliable comrades out in the field, they specialize in a variety of offensive, defensive, and restorative support abilities. The hunter's Palico joins the Fifth Fleet with pride, as much a bona fide member of the Commission as any other hunter.
You only get one Palico. The one you customize during character creation will be the only companion Palico. Others will be in the Town or Players Housing but do not accompany the Hunter.
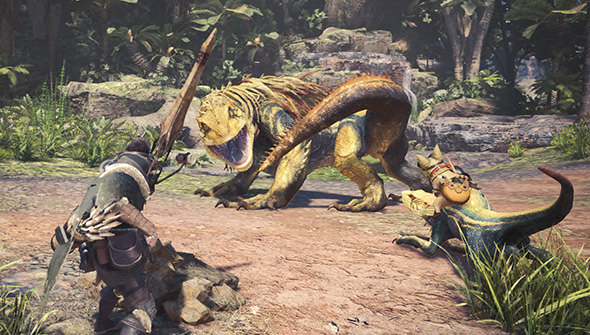
Palicoes are reliable comrades while out on the hunt. They'll support you in numerous ways during quests, from attacking monsters to utilizing useful gadgets.
Palicoes in MHW
- Palicoes can be outfitted with Weapons and Armor that you make for them in Crafting
- They can be leveled up according to traits and roles you wish for them to serve
- In combat, they can support you with offensive and defensive maneuvers
- They can serve as harvesting helpers for gathering Items in the wild
- They can communicate with local wild cats and convince them to help hunters by setting traps
- Only one Palico can be brought on a quest, but the Palico can temporarily recruit wild cats and small monsters to help. Sometimes another player's Palico can be encountered in the wild, and they will aid you--quite useful since they can also use Palico Gadgets.
- Palicoes can be equipped with gadgets that give powerful bonuses on command
- The max level for your Palico is 50 (Patch 6.02)
- The max level of Tailraider Unity is 10. (Patch 6.02)
Palico Gadgets
All Palico Gadgets have two stages and your Palico will use their gadgets semi-frequently on their own. After levelling a gadget to lv5, an icon will appear in your quickbar to use the first stage at the player's command e.g to place a flashfly cage. After reaching lv10 with a gadget, a second icon will become available allowing you to use the second stage of the gadget on command. This can be useful to place things like vigorwasp stations or shock traps shortly before a fight. Gadget proficiency level cap has raised from 10 to 15 since patch 6.02.
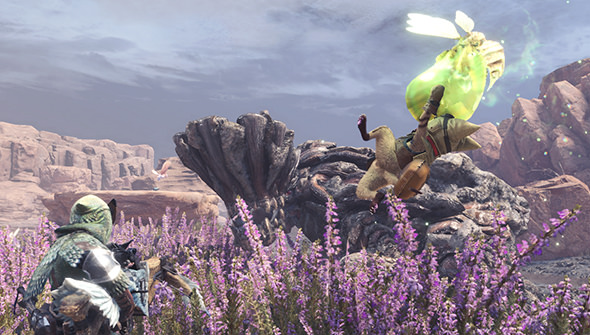
- Vigorwasp Spray: The Palico pulls out a vigorwasp and rides it towards the hunter. It then explodes, healing the hunter. When leveled up, the Palico can also deploy a stationary vigorwasp, like one found in the wild.
- Flashfly Cage: The Palico pulls out a cage with a flashfly in it. The hunter can then hit the cage to create a large flash. Very useful for fighting flying wyverns like Rathalos or Legiana. When leveled up, the Palico can deploy an electric shock trap. Beware, overuse of traps and flashes will cause a monster to become resistant.
- Shieldspire: The Palico pulls out a shield with a face on it. The Palico then taunts the monster into attacking it while using the shield to stay alive. The next ability of the Shieldspire is a shield bash which can stagger and stun a monster if it hits.
- Coral Orchestra: The Palico pulls out a Coral Instrument. The Palico then plays one of several songs that applies a buff (e.g. Attack Up, Defense Up, Bleeding Resistance, Stamina Drain Down). Upon levelling up the Palico gains access to a second instrument with some improved buffs, such as the ability to negate environmental damage from lava, giving the player the earplug effect, divine protection or stun resistance/negation.
- Plunderblade: The Palico pulls out a Plunderblade and snatches items from monsters (e.g. scales, fangs ...). Items snatched this way go directly to the Palico inventory and will be received at the end of the quest or expedition. Upon levelling up, the Palico is able to throw the Plunderblade. If this thrown blade hits a monster, the monster will drop an item, which may be either an appropriate scale or talon, or a slinger ammo e.g Piercing pods.
- Meowlatov Cocktail: The Palico pulls out a ceramic pot and throws it at monster causing it to explode and deal damage. The upgraded version has your Palico roll around with a small cannon and shield. These attacks can easily stagger large monsters.
Role in the Main Story/Lore
A Felyne partner that joins the Fifth Fleet hunter in their travels, coming to the New World along with their A-List hunting partner. Palicoes provide support with various weapons and tools used in hunting and, being lynians, can also use their own physical abilities to contribute to investigations in the New World.The Palico met the Hunter, their present partner, in the Old World and carried out several requests for them. Perhaps because of that long association, the Palico wanted to be taken along on the next fleet so the Hunter could see them making good use of Palico Gadgets. That reveals their trust and affection for their partner.
Many types of Lynians live in the New World. Each has their own culture and linguistic systems, so direct interaction is difficult, but Palicoes are highly active as go-betweens. They can understand human languages, they can actualize interactions with Lynians as they investigate evidence of them. Sometimes they exchange information, and sometimes they join in on hunts. These things forge friendly relationships. Finally, they can also learn the languages of small monsters and can control those small monsters by feeding them. It wouldn't be an exaggeration to say they are indispensable in the investigation of the New World.
Palicoes and Grymalkines
Palicoes can acquire additional skills, but to unlock them, you'll need assistance from Grimalkynes. These petite feline creatures share similarities with Palicoes but lean a bit more towards the wild side. Grimalkynes possess the ability to teach your Palico how to communicate with other monsters in the local vicinity, a handy skill when dealing with certain larger foes. Additionally, they can offer temporary assistance to those who have befriended them when encountered on the map. Once befriended, and they join your entourage, you'll see a boost in their health and effectiveness during hunts.
Ancient Forest - Bugtrappers
Once the upper area of the Ancient Forest is unlocked (Camp 17) enter the Ancient Forest in Expedition mode and find doodles around the map made by the Bugtrappers. Once enough doodles have been collected open your map and find a tailrider icon with a description of ???. Mark it and follow your scout flies to it where you'll find a lone Bugtrapper that will run. Chase it back to its camp (near Camp 17). Once you arrive at its camp your Palico will talk to it and befriend it asking to join the Bugtrappers.
Rewards
- Flashfly Cage - A Bugtrapper insect cage used to stop monsters in their tracks. Its effectiveness varies with the type of insect inside, and the duration increases with Proficiency (In-Game Description)
- Max Proficiency Reward - Boombug Cage
- Ability to befriend Jagras and make them tailraiders.
Wildspire Waste - Protectors
Start this quest by finding doodles, just like the Forest find enough till you can track them on your map. Follow your scout flies to an area near (Camp 15), there you'll find a lone Protector worried about his friends after they got separated by a Barroth. He'll ask you to find them and capture them with your capture net. Your Palico will then mark their locations on your map. Go to each and attempt to capture them ( Ghillie Mantle has no effect on them meaning they will still run if you approach with your Ghillie Mantle equipped? [Unverified] ), they will be scanning the area so approach when they aren't looking and capture them. Once all three have been captured, return to the first Protector and he'll befriend you.
Rewards
- Shieldspire - A massive Protector shield used to defend against attacks. It can also be used to provoke monsters, drawing their attention. Guard effectiveness increase with Proficiency. (In-Game Description)
- Max Proficiency Reward - Shieldspire Bash ability
- Ability to befriend Kestodon and make them tailraiders.
Coral Highlands - Troupers
Begin this sub-quest like the other two. Find the Troupers in Area 10, they will be riding Shamos and attack, defeat them and they will run, follow them to their hideout where they will explain they were planning on hunting two Tzitzi-Ya-Ku's that have been causing trouble. Your Palico will offer to help and you'll receive an Optional Quest to complete which involves defeating two Tzitzi-Ya-Ku's. (You do not have to wait for a Lynian Researcher to be present in the area.)
Rewards
- Coral Orchestra - An instrument of Trouper make, able to yield a variety of effects. Its melodies boost attack, defense, or status resistances. Those effects increase with Proficiency. (In-Game Description)
- Max Proficiency Reward - Coral cheerbongo.
- Ability to befriend Shamos and make them tailraiders.
- Melodies [unverified and not necessarily complete]. Divine blessing, attack, defence, affinity, increased recovery of recoverable (red) damage, ear plugs.
Rotten Vale - Plunderers
To start this quest the sub-area of the Vale must be unlocked, and be on a Solo Expedition. Find a Plunderer in Area 13, it only appears after the Odogaron has dragged over the Legian corpse from Area 9. Then chase it with scout flies to the dead end in Area 15. Put out Raw Meat when told to by your Palico. After a few moments multiple Plunderers will come to eat the meat. You will get the usual cut scene before they join you. (You do not have to wait for a Lynian Researcher to be present in the area.)
Rewards
- Plunderblade - An invention on the Plunderers that snatches items from monsters when attacking. The quantity of stolen items increases with proficiency. (In-Game Description)
- Max Proficiency Reward - Palarang
- Ability to befriend Girros and make them tailraiders.
Elder's Recess - Gajalaka
To start this quest you must have befriended all the other Grymalkynes. Speak to the Lynian Researcher in Astera by the Ecological Research area. This will give you a new Critical Bounty called Gajalaka Exchange: Gajalaka Linguistics in which you must find 10 Gajalaka Tracks. These appear as Gajalaka Doodles and only in high rank zones. Each locale (Not necessarily each zone) has at least 2 doodles, some may have more. Doodles appear relatively close to where Gajalaka spawn (filter your map by "small monsters" to locate them). Doodles do not respawn, not even if you go back to Astera and return.
- Ancient Forest - Areas 5, 15
- Wildspire Wastes - Areas 3, 5, 7
- Coral Highlands - Area 12, 6 (found at the Bottom of area 6)
- Rotten Vale - Area 3 (2 doodles), 15 (you can find 3 doodles here without Gajalaka)
- Elder's Recess - Area 8
After you turn in the Bounty you must speak with the Lynian Researcher again to get Gajalaka Exchange: Gajalaka Linguistics II. Equip your Ghillie Mantle to make this one easier then return to the Elder's Recess AT NIGHT. You can wait for night, or simply go into your tent within one of your camps (where you can change Palico and your own gear and heal up, your character literally drinks tea there) to trigger the change. When you arrive the Lynian Researcher will be at the entrance of the Gajalaka Camp. From there sneak into the camp without being seen. The Ghillie Mantle will make you invisible. When you get close enough to the fire without being noticed the camera will zoom in on a hole in the wall, interact with the hole without being seen to complete the quest. (Note: "Wild" Gajalaka will remain hostile in all zones, ally Gajalaka will be marked with green indicators like other tailraiders.)
Rewards
- Meowlotov Cocktail - Throws a Gajalaka-style bomb that deals damage. Combines with the Palico slinger to allow for sustained fire. Blast Strength increases with proficiency. (In-Game Description)
- Max Proficiency Reward - [Unknown]
- Ability to befriend Gastodon and make them tailraiders.
- 5 shortcut tunnels throughout Elder's Recess.
- Access to area 16.
Hoarfrost Reach - Boaboa
After the completing the third Iceborne quest, Ready to Strike, the Linean Researcher will appear in Hoarfrost Reach near campsite 1. Speak to him and he'll tell you that in order to gain the Boaboa's favor, you must impress them. To do so, you must successfully hunt a large monster in front of the Boaboa scouts, to which they will aid you. Next, your Palico will tell you that the Boaboa wish to speak with you. Travel down the path away from campsite 1, just until you crawl under the large branch. A group of Boaboa will ask you to meet them at their lair. Head to area 2 and take the wingdrake. Climb up the waterfall rocks and through the corridor at the northeast corner to their lair. Speak to the Boaboa within the lair, they will offer you the quest By Our Powers Combined. Accept the quest and hunt the tempered Beotodus.
Rewards
- Tailraider Signal - A signal to call a Grimalkyne to your aid.
- Max Proficiency Reward - [Unknown]
- Purple Boaboa's will no longer attack you
- A shortcut to area 17 (upon reaching level six Unity)
Role in the Main Story/Lore
A Felyne partner that joins the Fifth Fleet hunter in their travels, coming to the New World along with their A-List hunting partner. Palicoes provide support with various weapons and tools used in hunting and, being lynians, can also use their own physical abilities to contribute to investigations in the New World.
The Palico met the Hunter, their present partner, in the Old World and carried out several requests for them. Perhaps because of that long association, the Palico wanted to be taken along on the next fleet so the Hunter could see them making good use of Palico Gadgets. That reveals their trust and affection for their partner.
Many types of Lynians live in the New World. Each has their own culture and linguistic systems, so direct interaction is difficult, but Palicoes are highly active as go-betweens. They can understand human languages, they can actualize interactions with Lynians as they investigate evidence of them. Sometimes they exchange information, and sometimes they join in on hunts. These things forge friendly relationships. Finally, they can also learn the languages of small monsters and can control those small monsters by feeding them. It wouldn't be an exaggeration to say they are indispensable in the investigation of the New World.
Palico Gallery
Palico Weapons in Monster Hunter World (MHW) are used by Palicoes to attack and deal damage to Monsters. Palico Weapons are handled a bit different than player Weapons and there are much fewer to choose from. Below is a list of Palico Weapons in Monster Hunter World.
Palico Weapons (MHW)
| Name | Rarity |  |
||||||
|---|---|---|---|---|---|---|---|---|
|
|
1 | 2 | 2 | Severing | None | 0% | - | |
|
|
1 | 4 | 2 | Blunt | None | 0% | - | |
|
|
1 | 5 | 3 | Blunt | None | 0% | - | |
|
|
1 | 3 | 5 | Blunt | None | 10% | - | |
|
|
2 | 4 | 6 | Blunt | 0% | - | ||
|
|
2 | 2 | 4 | Severing | None | 0% | - | |
|
|
2 | 12 | 8 | Blunt | None | -20% | +5 | |
|
|
2 | 7 | 6 | Severing | 0% | - | ||
|
|
2 | 6 | 5 | Severing | 10% | - | ||
|
|
3 | 14 | 12 | Blunt | -30% | - | ||
| 3 | 10 | 6 | Blunt | 20% | - | |||
|
|
3 | 10 | 8 | Severing | 0% | - | ||
|
|
3 | 10 | 12 | Blunt | None | 0% | - | |
|
|
3 | 10 | 8 | Blunt | 0% | +5 | ||
|
|
3 | 10 | 8 | Blunt | 0% | - | ||
| 3 | 14 | 8 | Severing | -20% | - | |||
|
|
4 | 8 | 8 | Severing | 0% | - | ||
|
|
4 | 11 | 11 | Severing | None | 30% | - | |
|
|
4 | 16 | 14 | Severing | 10% | - | ||
|
|
4 | 18 | 10 | Blunt | None | 20% | +10 | |
|
|
4 | 16 | 14 | Severing | 0% | Low | - | |
| High Rank |
Rarity | |||||||
|
|
5 | 25 | 14 | Severing | None | 0% | - | |
|
|
5 | 30 | 10 | Blunt | None | 0% | - | |
|
|
5 | 32 | 12 | Blunt | None | 0% | - | |
|
|
5 | 26 | 12 | Blunt | None | 20% | - | |
|
|
5 | 30 | 22 | Blunt | 0% | - | ||
|
|
5 | 20 | 18 | Severing | None | 0% | - | |
|
|
5 | 36 | 20 | Blunt | None | -20% | +10 | |
|
|
5 | 32 | 18 | Severing | 0% | - | ||
|
|
5 | 30 | 14 | Severing | 10% | - | ||
|
|
5 | 40 | 28 | Blunt | -30% | - | ||
|
|
5 | 46 | 21 | Severing | 0% | - | ||
|
|
5 | 48 | 19 | Blunt | 0% | +16 | ||
|
|
5 | 44 | 23 | Blunt | 0% | - | ||
| 5 | 38 | 32 | Blunt | 0% | -- | -- | ||
|
|
6 | 25 | 12 | Severing | 0% | +5 | ||
|
|
6 | 46 | 27 | Severing | None | 30% | - | |
|
|
6 | 60 | 20 | Blunt | None | -20% | - | |
| 3 | 14 | 12 | Blunt | 0% | -- | |||
| 6 | 44 | 36 | Blunt | 0% | -- | -- | ||
| 6 | 50 | 40 | Blunt | 0% | -- | -- | ||
|
|
7 | 55 | 25 | Blunt | 0% | +25 | ||
|
|
7 | 52 | 30 | Blunt | 0% | - | ||
|
|
7 | 45 | 26 | Severing | 0% | Low | - | |
|
|
7 | 50 | 40 | Severing | None | 20% | - | |
|
|
8 | 70 | 16 | Blunt | 0% | High | - | |
|
|
8 | 56 | 32 | Severing | 10% | - | ||
|
|
8 | 58 | 26 | Blunt | 0% | - | ||
|
|
8 | 60 | 26 | Severing | 0% | Average | - | |
|
|
8 | 42 | 25 | Severing | 0% | - | ||
|
|
8 | 55 | 40 | Severing | 10% | Low | - | |
| 8 | 40 | 55 | Blunt | 0% | Average | +20 | ||
| 8 | 70 | 20 | Severing | -- | 10% | -- | -- | |
| 8 | 60 | 50 | Blunt | None | 0% | 30 | ||
| 8 | 65 | 16 | Severing | 0% | -- | -- | ||
| 6 | 40 | 40 | Blunt | None | 0% | - | ||
| 7 | 65 | 22 | Blunt | -20% | High | - | ||
| 7 | 56 | 44 | Blunt | 0% | -- | -- | ||
| ?? | ?? | ?? | ?? | ?? | ?? | ?? | ?? | |
| 3 | 16 | 10 | Blunt | 0% | -- | -- | ||
|
|
3 | 12 | 10 | Blunt | 0% | -- | -- | |
| 7 | 56 | 44 | Blunt | 0% | - | - | ||
| ?? | ?? | ?? | ?? | ?? | ?? | ?? | ?? | |
| 5 | 48 | 18 | Blunt | 70 Paralysis | 0% | -- | +10 | |
| ?? | ?? | ?? | ?? | ?? | ?? | ?? | ?? | |
| ?? | ?? | ?? | ?? | ?? | ?? | ?? | ?? | |
| ?? | ?? | ?? | ?? | ?? | ?? | ?? | ?? | |
|
|
?? | ?? | ?? | ?? | ?? | ?? | ?? | ?? |
| 9 | 30 | 50 | Severing | None | 0% | -- | -- | |
| 9 | 30 | 40 | Blunt | 0% | -- | -- | ||
| 9 | 60 | 30 | Blunt | None | -20% | -- | -- | |
| 11 | 110 | 40 | Blunt | |
-15% | - | - | |


Iceborne Palico Equipment in Monster Hunter World (MHW) is Palico gear added with the paid ![]() Iceborne Expansion. This DLC-exclusive gear can be changed much the way players can change their own. Palicoes can equip 4 different equipment: Weapons, Helms, Chest Armor and Gadgets. Palico Equipment works much the same way that player Equipment does, and is made from Materials that drop from Monsters.
Iceborne Expansion. This DLC-exclusive gear can be changed much the way players can change their own. Palicoes can equip 4 different equipment: Weapons, Helms, Chest Armor and Gadgets. Palico Equipment works much the same way that player Equipment does, and is made from Materials that drop from Monsters.
Iceborne Palico Weapons
| Name | Rarity | |
||||||
|---|---|---|---|---|---|---|---|---|
 Felyne Trekker Peckaxe Alpha + Felyne Trekker Peckaxe Alpha + |
9 | 50 | 20 | Severing | None | 0% | -- | -- |
 Felyne Bone Hammer Alpha + Felyne Bone Hammer Alpha + |
9 | 55 | 15 | Blunt | None | 0% | -- | -- |
 Felyne Iron Sword Alpha + Felyne Iron Sword Alpha + |
9 | 45 | 25 | Severing | None | 0% | -- | -- |
 Felyne Jag Gunhammer Alpha + Felyne Jag Gunhammer Alpha + |
9 | 60 | 20 | Blunt | None | 0% | -- | -- |
 Felyne Kulu Lute Alpha + Felyne Kulu Lute Alpha + |
9 | 50 | 20 | Blunt | None | 25% | -- | -- |
 Felyne Pukei Bow Alpha + Felyne Pukei Bow Alpha + |
9 | 45 | 30 | Blunt | 0% | -- | -- | |
 Felyne Barroth Mace Alpha + Felyne Barroth Mace Alpha + |
9 | 60 | 25 | Blunt | None | -20% | -- | 15 |
 Felyne Jyura Sword Alpha + Felyne Jyura Sword Alpha + |
9 | 45 | 35 | Severing | 0% | -- | -- | |
 Felyne Beo Board Alpha + Felyne Beo Board Alpha + |
9 | 55 | 30 | Blunt | 0% | -- | -- | |
 Felyne Kadachi Fork Alpha + Felyne Kadachi Fork Alpha + |
9 | 40 | 30 | Severing | 15% | -- | -- | |
 Kitty-of-the-Valley Rod Alpha + Kitty-of-the-Valley Rod Alpha + |
9 | 45 | 25 | Blunt | 0% | -- | -- | |
 Felyne Grimalkyne Doll Alpha + Felyne Grimalkyne Doll Alpha + |
9 | 80 | 30 | Blunt | None | 0% | -- | -- |
 F Anja Bonehammer Alpha + F Anja Bonehammer Alpha + |
9 | 70 | 35 | Blunt | -30% | -- | -- | |
 F Rathian Rapier Alpha + F Rathian Rapier Alpha + |
9 | 55 | 40 | Severing | 0% | -- | -- | |
 Felyne Lumu Pawpads Alpha + Felyne Lumu Pawpads Alpha + |
9 | 60 | 40 | Blunt | None | 0% | -- | -- |
 Felyne Baan Ball Alpha + Felyne Baan Ball Alpha + |
9 | 85 | 20 | Blunt | 0% | -- | 20 | |
 F Deathgear Scythe Alpha + F Deathgear Scythe Alpha + |
9 | 60 | 35 | Severing |  Dragon 280 Dragon 280 |
0% | -- | -- |
| F Boaboa Bonehammer Alpha + |
9 | 75 | 30 | Blunt | None | 0% | -- | 25 |
 Felyne Artian Disc Alpha + Felyne Artian Disc Alpha + |
10 | 50 | 50 | Severing | Dragon 220 |
0% | Average | -- |
 Felyne Barioth Knife Alpha+ Felyne Barioth Knife Alpha+ |
10 | 70 | 35 | Severing | 20% | -- | -- | |
 Felyne Specter Scepter Alpha + Felyne Specter Scepter Alpha + |
12 | 80 | 35 | Blunt | Dragon 260 |
0% | Average | -- |
 Felyne Nami Rods Alpha + Felyne Nami Rods Alpha + |
12 | 40 | 70 | Blunt | 15% | -- | -- | |
 Felyne Ishvalda Orb Alpha + Felyne Ishvalda Orb Alpha + |
12 | 65 | 55 | Blunt | Dragon 300 |
0% | High | 30 |
 Felyne Godsblade Zapurr Alpha + Felyne Godsblade Zapurr Alpha + |
12 | 60 | 45 | Severing | 0% | -- | -- | |
 Felyne Daora's Wand Alpha + Felyne Daora's Wand Alpha + |
12 | 70 | 50 | Severing | 10% | -- | -- | |
 Felyne Kaiser Mace Alpha + Felyne Kaiser Mace Alpha + |
12 | 85 | 35 | Blunt | 0% | -- | -- | |
 Felyne Zorah Puppet Alpha + Felyne Zorah Puppet Alpha + |
12 | 66 | 44 | Severing | 0% | -- | 45 | |
 Felyne Mewsurper's Peal Alpha + Felyne Mewsurper's Peal Alpha + |
11 | 85 | 45 | Severing | 0% | -- | -- | |
 Felyne Garuga Fan Alpha + Felyne Garuga Fan Alpha + |
11 | 80 | 40 | Severing | 15% | -- | -- | |
 F Golden Gadget alpha + F Golden Gadget alpha + |
11 | 110 | 40 | Blunt | -15% | -- | -- | |
 F Wyvern Blade Green Alpha + F Wyvern Blade Green Alpha + |
12 | 75 | 40 | Severing | 0% | -- | 25 | |
 Wiggler Coral Alpha + Wiggler Coral Alpha + |
10 | 70 | 30 | Blunt | 0% | -- | -- | |
 Felyne Nergigante Hammer Alpha + Felyne Nergigante Hammer Alpha + |
12 | 95 | 35 | Blunt | Dragon 70 |
0% | High | -- |
 Felyne Hazak Sword Alpha + Felyne Hazak Sword Alpha + |
12 | 70 | 40 | Severing | Dragon 240 |
0% | Average | -- |
 Felyne Vangis Mace Alpha + Felyne Vangis Mace Alpha + |
11 | 80 | 30 | Blunt | Dragon 250 |
-20% | High | -- |
 Felyne Bazel Mace Alpha + Felyne Bazel Mace Alpha + |
11 | 70 | 40 | Blunt | 0% | -- | -- | |
 Felyne Samurai Sword Alpha + Felyne Samurai Sword Alpha + |
11 | 80 | 30 | Severing | None | 10% | -- | -- |
 Felyne Acorn Spade Alpha + Felyne Acorn Spade Alpha + |
10 | 60 | 40 | Severing | None | 0% | -- | -- |
 Felyne Xeno Bouquet Alpha + Felyne Xeno Bouquet Alpha + |
12 | 60 | 60 | Severing | Dragon 220 |
10% | Low | -- |
 Felyne Safi Spear Alpha + Felyne Safi Spear Alpha + |
12 | 65 | 65 | Severing | Dragon 200 |
20% | Average | -- |
 Felyne Shishi-mai Lamp Alpha + |
9 | 65 | 35 | Blunt | 0% | -- | 25 | |
 Forgefire α+ |
12 | 40 | 60 | Blunt | 0% | -- | -- | |
 Gold Chocobo Rod Alpha + |
12 | 50 | 60 | Blunt | Dragon 380 |
0% | Average | 20 |
 Cursed Staff Alpha + |
12 | 85 | 40 | Blunt | -- | -15% | -- | -- |
 Felyne Star Mic Stand Alpha + |
10 | 60 | 50 | Blunt | 0% | -- | -- | |
 Space Machine Alpha + |
10 | 45 | 65 | Severing | 0% | -- | -- | |
 Mega Buster Alpha + |
12 | 65 | 65 | Blunt | -- | 0% | -- | -- |
 Felyne Maestro's Baton Alpha + Felyne Maestro's Baton Alpha + |
11 | 50 | 40 | Blunt | 0% | -- | -- | |
 Felyne Rural Pickaxe Alpha + Felyne Rural Pickaxe Alpha + |
11 | 50 | 50 | Severing | -- | 10% | -- | -- |
 Felyne Crusher Punch Alpha + |
12 | 80 | 30 | Blunt | 0% | -- | 10 | |
 F Grand God's Peer Staff Alpha + |
12 | 100 | 30 | Blunt | 5% | -- | 20 | |
 Felyne Butterfly Wand Alpha + |
11 | 70 | 40 | Blunt | 0% | -- | 10 | |
 Felyne Rose Basket Alpha + |
11 | 70 | 45 | Blunt | Dragon 130 |
10% | High | 10 |
 Felyne Kulve Fan Alpha + |
12 | 70 | 60 | Blunt | None | 0% | -- | 30 |
 Felyne Escador Scythe alpha + |
12 | 60 | 60 | Severing | Dragon 360 |
0% | Low | 30 |
 Felyne Pukei Horn Alpha + |
11 | 50 | 60 | Blunt | 0% | -- | - | |
 Felyne Aloha Ukulele Alpha + |
10 | 55 | 45 | Blunt | 0% | - | - | |
 Felyne Frostfang Sabre Alpha + |
11 | 85 | 40 | Severing | 0% | - | 10 | |
 Felyne Fatalis Weapon Alpha + |
12 | 75 | 75 | Severing | Dragon 150 |
20% | High | 40 |
 F Azure Era Fan Alpha + |
12 | 65 | 60 | Severing | 0% | - | 20 | |
 Felyne Azure Star Baton + |
12 | 60 | 45 | Blunt | 20% | - | - | |
 Felyne Frankie Steel Ball Alpha + |
11 | 70 | 60 | Blunt | 0% | -- | 15 | |
 Felyne Jack-o'-Lantern Alpha + |
11 | 60 | 40 | Blunt | 0% | -- | -- | |
 Anonymous
Jesus, could this page at least mentions the Felynes that AREN’T Palicoes, like Meowscular Chef and the Housekeeper??
- Anonymous
This entry is a straight copy and past of the "Palico" page.
There is another Palico Gadget "Meowlotov Cocktail" that you can get when finishing the Galajaka quest in Elder's Recess
The way this article is written would be deserving of a C grade if I were an English teacher. Extremely odd and hard to read sentence structure. Incoherent paragraphs that juggle between formal and informal terms just make this a displeasure to read. I was expecting a better layout akin to the Dark Souls wiki but this seems amateur.
2
+10
-1