

Shara Ishvalda |
|
|---|---|
 |
|
| Enemy Type | Large Monsters |
| Species | Elder Dragons |
| Elements | None |
| Ailments | |
| Weakness | |
| Resistances | |
| Location(s) | Origin Isle |
| Tempered Lv. | None |
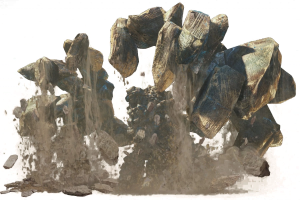
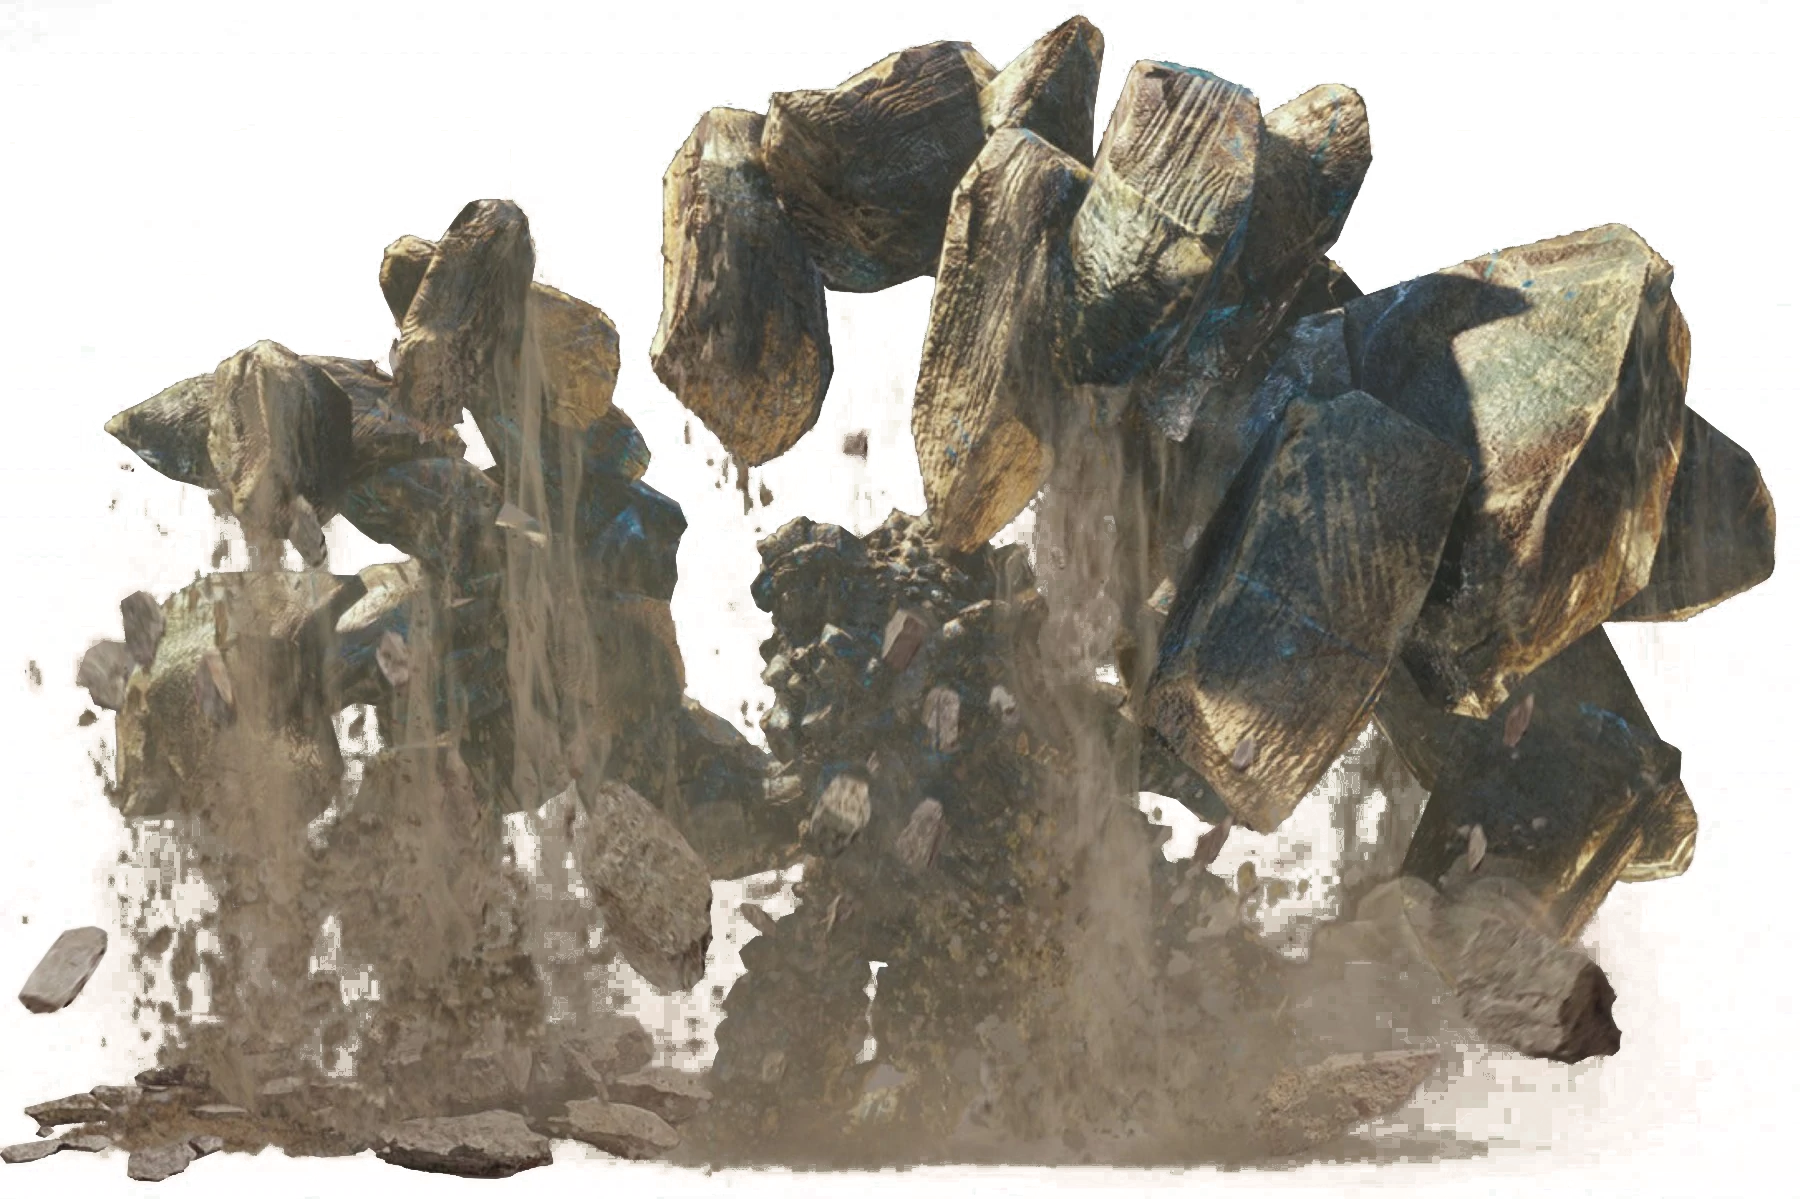
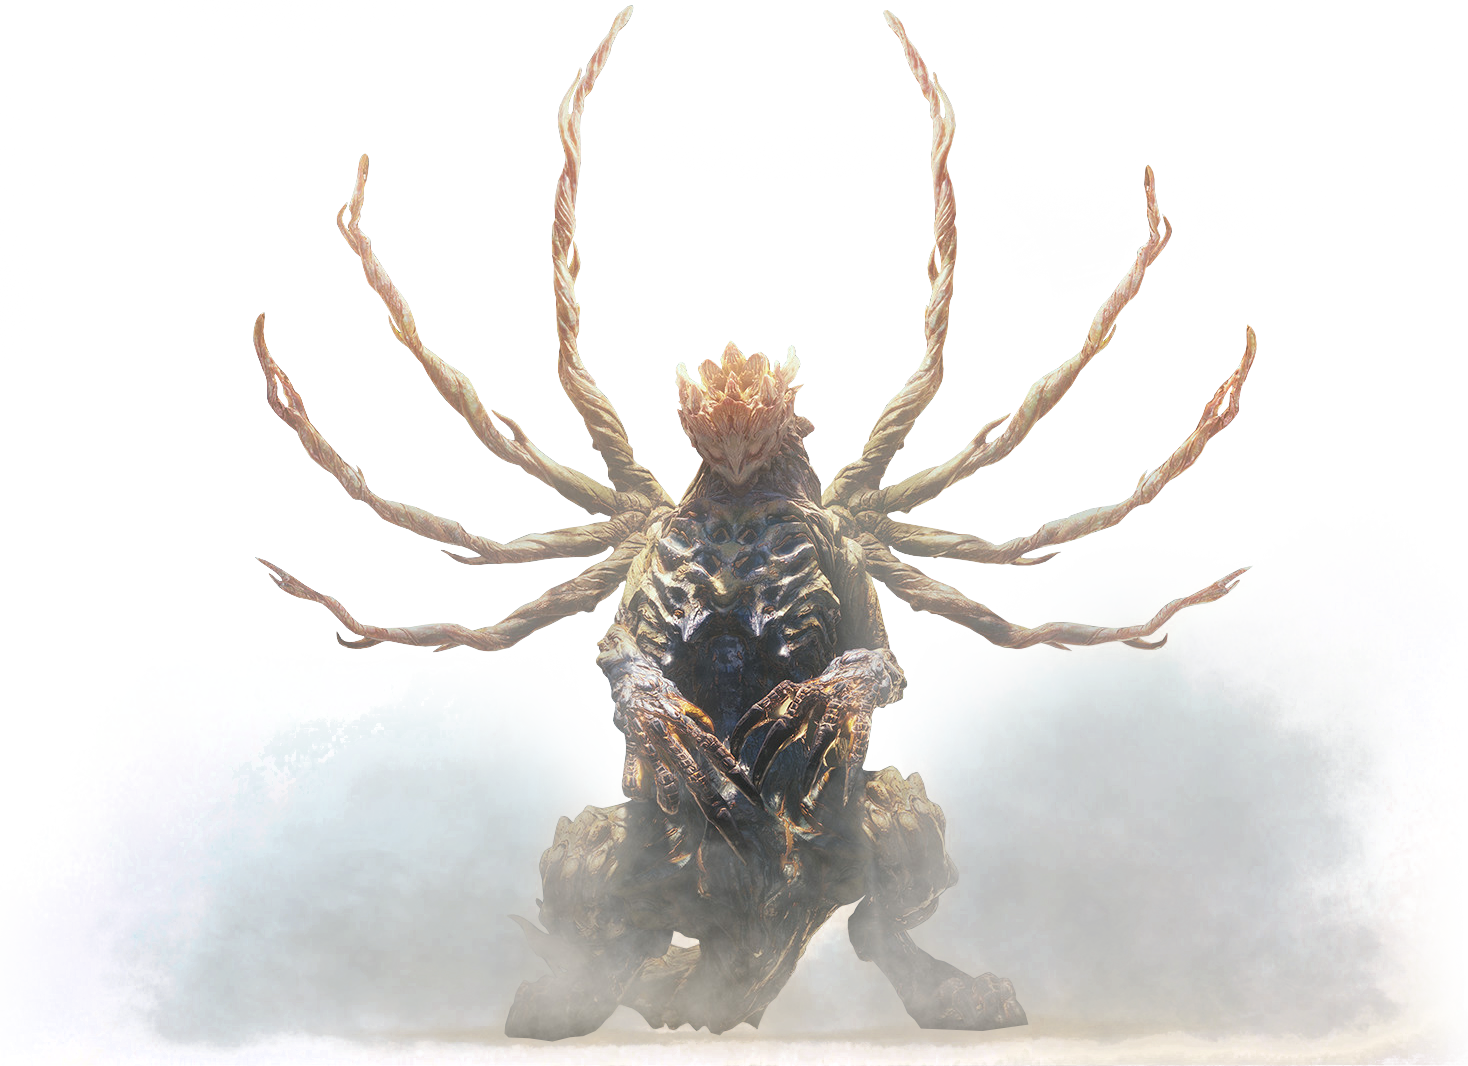
Shara Ishvalda is a Large Monster in Monster Hunter World (MHW). アン・イシュワルダ (地啼龍) in Japanese. It was added with the Iceborne Expansion on Sept. 6th, 2019 and acts as its final boss.
A mysterious elder dragon able to manipulate the earth itself. Vibrations from its wingtips reshape the earth, denying hunters footing.
Shara Ishvalda Details & Locations
- Found in: Origin Isle
- Target of Quests: Paean of Guidance, after completion, optional quest Faraway Lorelei appears randomly for 2 quests. Special Event Quest The Naked Truth.
- Is hostile when approached.
- Size: 2910.91 ~ 2910.91
- Species: Elder Dragons
- HP: ~37630(Solo), ~63,388(Duo), ~94,605(3 or 4 players)
Shara Ishvalda Combat Info
Kinsect Extracts:
- Red: Head/Wings
- Orange: Torso/Tail
- White: Legs
- Both stages can be mounted.
- You can use your Clutch Claw to latch onto its head and knock it into the rocks traps(trap icons on mini map) to deal massive damage.
- After it is freed, avoid being in front of it, and make good use of your Temporal Mantle, Health Booster or Vitality Mantle.
- Bring Lifepowder or use the skill Wide-Range so you might heal your allies.
- Stun Resistance is helpful during this fight.
- You can obtain Shiny Drops by attacking and breaking its legs, head and chest.
- Hunters must begin by stripping their sturdy rock armor: bombs and falling rocks are two proven methods. Skills to counter tremors are a boon against its wingtip attacks.
Armored form: Very slow, but immensely strong.
- Be careful when standing underneath it, as it will occasionally jump to crush any hunters underfoot.
- It will swipe at hunters with its wings, or use them as clubs to pound the ground.
- It will sometimes burrow its body underground, exposing only its back, head, and wings. When this happens everyone should stay directly in front of it's face which is 90% safe from all its attacks in this mode.
- It will also rake its wingtips from one side of the arena to the other, for 1 to 3 times. If you are up close attacking, and it starts to move backwards, it is about to use the "plow" move.
- It can also create pools of sand around itself with its wingtips.
Unarmored form: Faster, and heavily relies on using its wings to attack with vibrated air.
- It will continue to use its wings as melee weapons, along with the occasional bite.
- It can shoot a single beam of air at a time, or multiple using all of its wingtips.
- It can shoot a massive beam of air by centering its wingtips in front of its face.
- Occasionally, it will burrow to the edge of the arena, create a large sphere of air, then launch it towards the center of the arena as a wide-scale AOE attack.
- The pools of sand it creates resonate with it's sound/air attacks and explode after one of them touches it.
Shara Ishvalda MH World Combat Tips
A compilation of recommended Combat Tips and Items from the community and other Hunters:
- The Naked Truth: Players can consider doing The Naked Truth Event Quest at the same time since your objective is to Slay the Shara Ishvalda. Her higher health pool during this quest increases the chances of you being able to get the Scalp break before damaging her too much and killing her instead. However, this added health pool and damage boost will also give an increased challenge.
- Avoid using Lance or Gunlance weapons as this will pose more of a challenge during the second phase when going against the laser attacks.
- Ice Weapons: When considering Elemental equipment, note that the Shara Ishvald is weakest against Ice and is Immune to Water
- Farcaster: You need to change restock your potions or change your weapon if you are in the final story quest.
- Partbreaker: Good for severing large monster parts. Will be especially helpful during the Shara Ishvalda Rock phase.
- Rocksteady Mantle: Eliminates damage reactions, prevents wind effects, protects your hearing, and grants tremor resistance. You also receive less damage from attacks. Be careful with this tool in the second phase and avoid second-phase attacks. Getting caught in this attack will easily make you faint.
- Torch Pod: These are provided at the start of the match and can be used for the fight.
- Poison Smoke Bomb: (Use it when he sheds his shell.) he has a few moves that make him stationary and he has a huge HP pool.
- Mega Barrel Bomb: Place it at his hind leg and denote it with a barrel bomb
- Tremor Resistance: Grants protection against ground tremors which will be plentiful this fight.
- Use a Health Boost to compensate for her high-damage hits
- Use Damage Up and Crit Boost to maximize damage as much as possible, since players tend to run out of time during Combat even when hold up well.
- Position: Position yourself to either side in between attacks and run in only when you see an opening. His behind is the safest but least damaging position. You can also remain at its underbelly. For the most valuable loot, focus all your attacks on its scalp.
- Mount: Though it is difficult, it is possible to Mount the Shara Ishvalda. You'll need to cling on to him while mounting him.
- Use Environment: There are rocks and boulders in the arena that can be knocked on the Shara Ishvalda. This will successfully knock him down while dealing a great amount of damage. This is most effective once you have softened his hide.
- During her ranged bomb attacks in Phase 2, you will need to stay at the edge of the arena. This is also where you can use Farcaster.
Shara Ishvalda has three phases in his fight starting with the Rock covered phase. Those who want to get a scalp break will focus their heavy attacks on its face. Though the back of the Shara Ishvalda is the safest spot, it is also the spot that does the least damage when attacked. Players also generally are pressed for time when facing the Shara Ishvalda, but this is also a goo position to get behind his hindlegs so you can tenderize this part while keeping close to the Shara Ishvalda. The Underbelly also does a decent amount of damage if you are not so focused on getting the Scalp break. To quickly and most efficiently get this carve done, all Hunters in the party will need to focus their attacks on the head of the Shara Ishvalda for the highest chance at breaking it twice with Partbreaker to break away the Rocks in the first phase. Try to get this done in the first phase as much as possible since the danger around his head will increase during phase 2.
In Phase 2, you will need to watch for when to steer clear of his head area, since he has a new last beam attack. To continue your attacks on its head, keep to the side or clutch onto it from the side until his laser attack begins.
Overall, you will need to watch the ground for his next moves and to watch out for sand puddles. Focus on getting a break and knocking it over to optimize all your attacks and its damage intake.
Shara Ishvalda MH World Easy Hunt
- Make sure to eat at the canteen before going into this quest or Farcaster to do so.
- For Shara Ishvalda's rock form, make sure to wall slam it twice into the falling wall trap. This can be easily set up by standing by it to lure Shara to it. You can also trigger the trap using bombs.
- When Shara Ishvalda sheds its rock armor, you can stay on its rear, using clutch claw to weaken it. Just keep attacking the rear portion of its body and you should be very safe.
- In the rockless state there will be 3 wall traps to slam Shara Ishvalda into, but if Shara Ishvalda triggers them (shoots with air) they will not deal damage to it. Again you can trigger these traps using bombs but make sure Shara is close enough.
Going for the Scalp Break Shara Ishvalda
- You need two Shara Ishvalda Tenderplates (and one gem) for every Shara-Ishvalda weapon, which are good for mid-tier Master Rank. Obtaining the Tenderplate can be difficult as it can't be carved from its corpse
- Shara Ishvalda's head can be broken twice to get the Scalp to drop. Carving the Scalp will give you two Tenderplate
- To avoid killing Shara Ishvalda before you get the Scalp to drop, you need to go for the head as much as possible
- Partbreaker 3 is a must have, as it will decrease the overall damage you need to deal to the head
- A Great Sword is a very good choice, as it has a long reach, high damage and a hidden Partbreaker bonus on the Charged Slashes. The Beo Slasher II is a good choice, as it will deal decent damage without charms or gems and is relatively easy to craft.
- In Phase two (Closed Eyes), go for the head exclusively. If done right, you can get the scalp before phase three starts.
- Tenderize the head as soon as possible with a grappled attack. Keep it tenderized at all times.
- Shara Ishvalda leaves its head usually open after every attack. Put priority on avoiding its attacks by sprinting and go for draw attacks on the head. Avoid hitting anything else.
- Some of its attacks will leave Shara Ishvalda's head unprotected for longer, letting you get a Strong Charge Slash in. Don't go for a True Charge Slash or Shara Ishvalda will hit you.
- Using the slinger burst to slam Shara Ishvalda into a wall will count as damage to the head.
- If Phase three (Eyes open) starts and you haven't broken the Head twice yet, go for the Front legs.
- Breaking either one of the front legs will knock Shara Ishvalda down long enough to get a True Charge Slash on its head. Use this to finally break the scalp off.
- Aiming to break Shara Ishvalda's head can result in a very drawn out fight.
- Three pieces of Tigrex Armor allow you to stack three Free Meals, greatly increasing your healing supplies.
- Carry a Farcaster to return to your camp if you ever run low on supplies.
- Bring Dash Juice, as you will do a lot of sprinting.
- Health Boost 3 is pretty good considering Shara Ishvalda's extreme damage output can easily twoshot you without it.
- As soon as the scalp breaks, your first priority should be to carve it. Beam attacks are a great opportunity to go in for the carve.
Shara Ishvalda Weaknesses
Each ⭐star shown below represents more weakness to each ailment
| Ailment | |||||
|---|---|---|---|---|---|
| Weakness Level | ⭐⭐ | X | ⭐ | ⭐⭐⭐ (armored) ⭐⭐ (unarmored) |
⭐ |
Each ⭐star shown below represents more weakness to each damage type
| Weak Point | |||
|---|---|---|---|
| Head | ⭐⭐ (armored) ⭐⭐⭐ (unarmored) |
⭐⭐ (armored) ⭐⭐⭐ (unarmored) |
⭐⭐⭐ (armored) ⭐⭐ (unarmored) |
| Forelegs (Breakable) | ⭐⭐ | ⭐⭐ | ⭐⭐ |
| Wings (Breakable) | ⭐⭐⭐ (armored) ⭐⭐ (unarmored) |
⭐⭐⭐ (armored) ⭐⭐ (unarmored) |
⭐⭐⭐ (armored) ⭐⭐⭐ (unarmored) |
Detailed weakness information(Legend Explanation: here)

Credits to AsteriskAmpersand, Deathcream and MoonBunnie.
Shara Ishvalda Low and High Rank Carves
Defeating this monster allows the player to carve the following items:
Shara Ishvalda Carves (All Master Rank)
| Carves | Frequency | % |
| ⭐⭐⭐⭐⭐ | 33% | |
| ⭐⭐⭐⭐ | 27% | |
| ⭐⭐⭐⭐ | 21% (50%) | |
| ⭐⭐⭐ | 15% (28%) | |
| ⭐ | 50% from broken Scalp only | |
| ⭐ | 5%, 50% from broken Scalp |
Shara Ishvalda Rewards (All Master Rank)
| Rewards | Frequency | % |
| ⭐⭐⭐⭐ | 24% (70%) | |
| ⭐⭐⭐⭐ | 32% (64% / 30%) | |
| ⭐⭐⭐ | 18% (70%) | |
| ⭐⭐⭐ | 13% (70%) | |
| ⭐⭐ | 9% | |
| ⭐⭐ | 9% | |
| ⭐ | 2% |
Shara Ishvalda Weapons & Armor
Armor and Weapons related to the Shara Ishvalda Monster. These are unconfirmed and pre-release information for now!
Weapons
 Winged Seraphyd
 Noble Ana Palas
 Bazel Bombers
 Reverent Elusarca
 Victorious Northlein
 Austere Paradise
 Knightly Ectis
 Broken Silence
 Evanescent Glow
 Inescapable Karma
 Infinite Wisdom
 Dawning Insight
 Fading Blossom
 Solemn Reflection
Armor


Notes & Trivia
- It is known as the "Earth Singing Dragon" or "Old Everwyrm".
- It is the first large monster to have the "Switch Display" option in its Hunter's Notes entry.
- It is the first monster to have an alternate form for its Physiology and Rewards pages.
- When its eyes open, they appear to track the camera instead of the hunter. The reason for this, as theorised by fans, is that Shara stares directly into the soul of a hunter, which is actually the player controlling the hunter, making this a fourth wall break. Also, when fighting it in multiplayer, every player perceives the eyes tracking them, disregarding anyone else.
- The eyes aren't actually coded to track the camera. The effect is achieved via hollow-face illusion, due to the eyeballs being concave.
- Despite the Hunter's Notes not marking the wings as breakable in its unarmored form, they still are breakable; they're just harder to hit properly.
-
 Shara Ishvalda (armored) render.
-
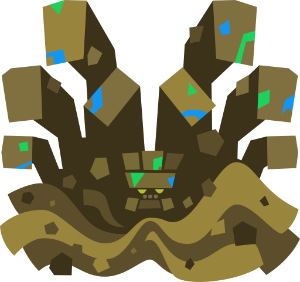 Shara Ishvalda icon.
-
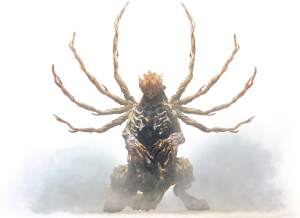 Shara Ishvalda (unarmored) render.
| Large Monsters |
Acidic Glavenus ♦ Alatreon ♦ Ancient Leshen ♦ Anjanath ♦ Azure Rathalos ♦ Banbaro ♦ Barioth ♦ Barroth ♦ Bazelgeuse ♦ Behemoth ♦ Beotodus ♦ Black Diablos ♦ Blackveil Vaal Hazak ♦ Brachydios ♦ Brute Tigrex ♦ Coral Pukei-Pukei ♦ Deviljho ♦ Diablos ♦ Dodogama ♦ Ebony Odogaron ♦ Fatalis ♦ Frostfang Barioth ♦ Fulgur Anjanath ♦ Furious Rajang ♦ Glavenus ♦ Gold Rathian ♦ Great Girros ♦ Great Jagras ♦ Jyuratodus ♦ Kirin ♦ Kulu-Ya-Ku ♦ Kulve Taroth ♦ Kushala Daora ♦ Lavasioth ♦ Legiana ♦ Leshen ♦ Lunastra ♦ Namielle ♦ Nargacuga ♦ Nergigante ♦ Nightshade Paolumu ♦ Odogaron ♦ Paolumu ♦ Pink Rathian ♦ Pukei-Pukei ♦ Radobaan ♦ Raging Brachydios ♦ Rajang ♦ Rathalos ♦ Rathian ♦ Ruiner Nergigante ♦ Safi'jiiva ♦ Savage Deviljho ♦ Scarred Yian Garuga ♦ Seething Bazelgeuse ♦ Shrieking Legiana ♦ Silver Rathalos ♦ Stygian Zinogre ♦ Teostra ♦ Tigrex ♦ Tobi-Kadachi ♦ Tzitzi-Ya-Ku ♦ Uragaan ♦ Vaal Hazak ♦ Velkhana ♦ Viper Tobi-Kadachi ♦ Xeno'jiiva ♦ Yian Garuga ♦ Zinogre ♦ Zorah Magdaros |
 Anonymous
I've fought this guy like 5 times already and I've run out of time every time before I succeed no matter that weapons I use and it's infuriating..
- Anonymous
- Anonymous
How much damage/partbreaks do you need to make it take off the rocks?
- Anonymous
When he does the 10 laser wave in front of him i block because I cannot possibly get away with lance. Then, without a single flame of delay, he blasts me with his big laser. I can't do anything because I'm still locked into the blocking animation from the other lasers. Who did the QA on this ****?
- Anonymous
- Anonymous
- Anonymous
Just finished him for the first time. Cant believe Im done with mhw story now. Its been my first monster hunter since monster hunter tri, I would play this story even if it was 10x longer. Feeling kinda empty now :( I guess i start mh rise/sunbreak now? Idk why but Im doubting Ill get as invested in it as I have with world the past month tho :( Such an amazing game.
- Anonymous
This monster in co-op is emotionally painful. I have died to targeting-fakeout-360-giant-laser several times.
- Anonymous
Items that might useful in this fight:
1. Farcaster because you need to change restock your potions or change your weapon if you are in final story quest.
2. Poison smoke bomb(Plenty of it) (Use it when he shedded his shell.) because he has a few moves that make him stationary and he has huge hp pool.
3. Mega barrel bomb (You just place it at his hind leg and denote it with barrel bomb)
4. Ice weapon (Even with Ice insect glaive I barely slayed it with 1 minute left, funny enough it was slayed by my kinsect when I tried to get red buff again.)
- Anonymous
For breaking its scalp:
It's very helpful to use the rock traps. (I mostly can only use 1, since she detroys the others) I weaken the head first. Then I walk underneath her to cause her to walk backwards towards a wall with a trap, then flinch shot her into it. She will generally rarely walk towards you, bc of her ranged attacks, so stay close to her at all times.
Also, when doing a solo run (which I recommend), give the palico a bad weapon (no meowlotov cocktail, I usually go for shieldspire), that way you can ensure ALL damage goes to the head.
I feel like blast weapons might be problematic since you can't easily control where it hits. But that is just a personal theory.
I believe it's possible with any weapon, but I used a bow. (Partbreaker 3, Weakness Exploit, Crit Eye/Boost)
Also, Food Skill Felyne Carver to get most out of the scalp carve
- Anonymous
- Anonymous
farming for tenderplates is MR Kushala levels of unfun, fighting it normally is alright I guess
- Anonymous
So here is what I do to beat her. I usually use either the DB, LS, or GS. I think Rimeguard armor is a good choice along with either Velk or Legiana weapons. I would recommend Health boost lvl3 because she hits hard. Tremor resistance also helps. When it comes to actually fighting her I usually clutch onto her and soften the head. I then take the slinger ammo and wall slam her into the falling boulders. I think it does around 3600 damage. When she gets up she usually isn’t enraged so I just slam her into the boulder again. When she is toppled go for the head. After that she usually unarmors herself. If you are trying to get the scalp keep wall slamming her. If may end up a rage fight but you have a decent chance of getting the scalp. If not I would still recommend wall slamming her into the boulders for some high damage. I usually stay at her front legs because it is quicker. It is more dangerous though. If you want it to last longer but be safer I would suggest going underneath her. By the way it might be a him. I don’t know. It sounds like a her but I think Shara means lord. I thinks that’s all I have to say for now. Happy hunting and don’t give up!!!!
~ Eriatha
- Anonymous
weakness exploit 3, crit boost 3, damage up 5, divine blessing 3, constitution 5, stamina recovery 2, free meal, 730 defense and ice bow. took me around 30 minutes. First phase is probably one of the easiest fights in iceborne. dont be reckless though, the wing ground slam-punch attack can straight up one hit you. tenderize the face and lay into it. second phase... dont bother to much with trying to hit the wings (ranged weakspot) and just tenderize the face again and go for it (or legs/tail if you want to play it safe, you seemingly cant tenderize the wings. Atleast i couldnt latch onto them). most attacks can be avoided by staying at the left or right side of him. Watch for the sandpits, they can screw you over big time. In phase 3 you can mostly continue as phase 2, just be mindful that his ranged attacks now have a larger range of effect (he moves his "wing fingers" when shooting his high frequency beams). The "spirit bomb" can be avoided by standing the very edge of the arena or using the farcaster, which has the added bonus of allowing you to restock (which i would heavily recommend in doing, getting in cqc coating range is a bit dicey, i´d advice to go for evade window or atleast put on the evasion mantle). Overall the fight isnt to hard, velkhana is way worse imo. Ishvalda weapons arent bad for raw damage builds or if you have the unleash skill to unlock it´s dragon element (high elemental damage and elderseal).... armor skills are nothing to write home about though (except for the arms having crit boost). The set does have a lot of gem slots though. The set bonus is nice, but it only activates if you have a mantle on. Though that isnt surprising, MH story and endgame monster armors and weapons tended to be mainly a bragging right. There were easier obtainable and better alternatives.
- Anonymous
I recommend doing "The Naked Truth" event quest if you really need the scalp break as Shara has more health in this quest which gives you a better chance of getting the break before it dies. Yes Shara has a damage boost as well in this quest but if you are familiar with the attacks I say just put partbreaker in your build and focus the head and you'll get a scalp break, it's what I did to farm tenderplates and it worked well.
- Anonymous
"They had us in the first half, not gonna lie.": the monster
- Anonymous
I actually believed this thing was the fully-developed form of Xeno’Jiiva, until Safi came in and flame blasted my eyes open
- Anonymous
- Anonymous
dog why does his eyes look like william birkins mutations eyes
- Anonymous
Coming down like precipitation,
I ain't never met a limitation
- Anonymous
- Anonymous
- Anonymous
This was very easy I farmed for its armor and LS and was very easy. When it is in rock armor wall slam it in to the falling boulders. Then when it destroys its armor just keep wall slamming it. It may end end up being a rage fight but it it worth it
- Anonymous
The pictures for the armor are wrong, its showing the beta for the alpha and the alpha for the beta
- Anonymous
with 2 or more hunters a good strat is to have someone fire him at a wall durring phases 2 / 3 and instanly have another person throw them so you get both sets of damage which i think is around 12k for both
- Anonymous
DON'T fight this thing with the lance, or even worse, the gunlance. It's good in the rock phase but you'll get blasted (literally) in the next one.
If you're going to fight it with the lance anyway, stay on his tail as much as you can but do NOT block the big beam - the chip damage through the block will add up to more than what you would have taken anyway from getting hit, and your guard will break unless you're at +5 guard with dash juice. Instead either take the hit or use lance charge to either side to escape. You can still block the little lasers though and usually make it out ok
- Anonymous
My favorite monster! Just has such a unique design / theme and everything about it from the music, the visuals and the set are awesome
- Anonymous
The Ballad of Shara Ishvalda
O great creature of earthen stone
Thy power far unknown
A Hunter rushes to his fate
To rid clean a land from your taint
A battle between dark and light
A fight of wit and might
One shall stand and one shall fall
Both shall inspire awe
- Anonymous
That fight was honestly underwhelming but the music was pretty good
- Anonymous
Absolute anti-lance monster. Blocking his laser deals even more damage than getting directly hit.
Together with other ground-effect monsters which ignore blocking totally the designers of iceborne really killed Lance-classes and the tiny amount of players is easily understandable.
- Anonymous
- Anonymous
- Anonymous
It’s ridiculous on how small shara is when you come it to xeno
- Anonymous
The most autistic face for the most boring laser spamming monster. it's just great.
- Anonymous
If your going for tenderscales / any part for weapons they changed the amount listed here so check in game first. The charge blade needs 6 though here it says 4
- Anonymous
Theory: Shara Ishvalda is an evolved Kulu-Ya-Ku
Proof: Rock, no rock
- Anonymous
- Anonymous
- Anonymous
Whoever wrote down that if you carve the Scalp you have 50% chance to get a Gem is a liar. Plain and simple. I'm a GS user, i easily get the Scalp always... Are you telling me that i had 14x50% chance to get a Gem and i got one from 7 tries? 14x50%? Nope... Its just 5%. I even used a Ticket every damn time i could fight with Shara Ishvalda. Just delete that "50% from broken Scalp" part... Btw i really doubt that its 5% from the body too, considering the fact that i looted the body more than 42 times with Ticket(when i started i didn't know about the Scalp, so i killed Shara at least 8~9 times) and got 0, but whatever. """Fun""" fact is: i actually got another one at the exact same try as a reward. Obviously i only needed 1.
When I was playing with my friend, She saw his wings/fingers and she was like, I want to be finger blasted by that thing, then I yeeted her into his super move.
- Anonymous
- Anonymous
- Anonymous
- Anonymous
- Anonymous
I read the spoilers and I thought it was another pukei pukei variant the whole time. I was waiting to encounter it, but I was not disappointed. This studio has some good designers. This is some seriously inspired stuff here.
- Anonymous
- Anonymous
Certainly not easy. Mirewalker skill helps with sand traps, start with blast and when it’s all cute with it’s eyes closed farcaster and switch for ice weapon. Part breaker is a must for the tender plate, but you can get by only breaking the head once. Do not give up. It’s really fun once you learn the boss
- Anonymous
- Anonymous
lol soloed this game all the way using kinsect build. Easy Boss no death and didnt even use potion xD
Fun game I like it!
- Anonymous
Trash quest design... From the nergi to a 3 phase final boss? Nergis enrage hits hard, but is survivable.
Then, boss design, starts slow, but its weak points in armored form are head and chest... which it uses its large size to smash you with (and... because its large this doesn't telegraph well). The slams are mostly avoidable. The armored phase is mostly just tedious busy work.
Unarmored now you have issues with .... pools of sand slowing you, insanely wide sweeping hits, its weak points like the head.. aren't within hitting range for many/most attacks, you have to go for the forelegs where the wide sweep of one or TWO wings thrusting underneath. Then... sand pools explode, so if you're caught in them, you're slower, easier to hit even with telegraphed large attacks, and the boss stuns too.
even the event vaal hazaak for bioweapon is far better designed (gear can mitigate zombie, or zombie isn't much of an invconvenience).
all told this one quest makes you go through four phases with lots of hard hits, pack farcasters, you'll require them for the first time ever.
- Anonymous
A lot of people cart to this easily. Following the gear advice of this wiki is terrible. Tigrex for speed eating? Val Hazaak. Beo sword? Velk, barioth....etc better ice gear. You should have better armor for it. Add some armor jewel, health boost, armor meal,armor skin, you can tank two blasts easy, maybe three if you go that far.just at least enough so you aren't one shotted or somthing.
Tip for head carvers, his head is high up, so besides slamming and ranged, you can wait for his laser to finish, he will lower his head for a bit right after, that's an opening for one hit, you can estimate where he lands. You can also try to spam clutch on his face with your friend, he will bite to shake you off, but the friend can smack his head while he does it. You won't take damage if you have temporal mantle.
- Anonymous
- Anonymous
I was trying to cut the tail when I first fought it. Glad they made the legs wound together w the tail, i got the message after 12 min of tail whacking.
- Anonymous
- Anonymous
Funny how coming back fresh to the game after a long break this guy is a breeze, my advice to anyone struggling with this guy is to abuse the wallbangs anytime his enrage wears off, especially in phase 2 following his big air bomb since he's lined up right infront of the rockfall enviromental trap.
- Anonymous
I really love he's lore and fight and all BUT..... his gosh darn sneak attack!!!! If you don't know what his sneak attack is well it is when he does the second wind bomb and immediately changes to his wind beam! This got many players by surprise because I was helping a guy complete the story quest and he just got 1 shot by it!
- Anonymous
it took me almost all my healing to defeat him for the first time. also who agrees that they got crepped out when his eyes follows you?
- Anonymous
- Anonymous
Farcasters are you friend in this fight. He’s not too difficult, just... annoying.
- Anonymous
after 10 tries on trying to kill this guy i finished him off with the clutch claw
- Anonymous
I never noticed it stared into the camera. Until this post and when I fought it again I failed from being Too mesmerized by them
- Anonymous
I watched and read too much about Shara Ishvalda, now I won't experience the same surprise when it stares into my soul. :(
- Anonymous
It gets easier everytime to get the Tenderplate. Make sure I destroy the rock phase in 5 mins, then using lbg, slicing ammo, sticky ammo her face all the time, farcasting back and forth for a refill. 40 mins fight but worth it ;D
- Anonymous
First 90% of the fight: Nothing much *opens eyes* p r e p a r e f o r h e l l
- Anonymous
Deadass almost cried when he woke up again after i killed him
- Anonymous
This thing looks amazing but in phase 3 it just goes all out creepy like it is staring into your soul looking at every one of your sins and actions and judging you...
- Anonymous
I can actually liken this monster to something straight outta darksouls. Which of course means I actually enjoy this fight; not because of anything in particular but because this all together culminates into an unnerving but difficult battle.
- Anonymous
- Anonymous
wait i just realized Shara has no element lmao no earth element, or anything? fire, water, thunder, ice, and dragon, but no earth? bruh moment
- Anonymous
YALL BULLING A PERFECTLY LOVABLE MONSTER i can think of so many reasons why this monster is so amazing SO WHY ARE YOU EVEN PLAYING THIS GAME
- Anonymous
- Anonymous
I would rather fight 400 Great Jagras than this trainwreck of boredom
- Anonymous
One time I showed a friend of mine who doesn’t play Monster Hunter the intro cutscene of Shara Ishvalda. The first thing he said was; “whats with those giant arms?”. Then I said; “those are his wings”, and he was like; :o
- Anonymous
This is the most boring monster so far. This thing is a massive damage sponge. It takes forever to kill it and it's not an enjoyable fight. I'll do it once just to progress and I hope I'll never have to do this again.
- Anonymous
- Anonymous
i love it when she has her eyes open and she's trying to stare at multiple people at once and her head twitches.
- Anonymous
This is one of those fights where everybody you see on Reddit beat it on their first try - solo and with no heals of course - but then they'll join into an SOS and triple cart in ten minutes.
- Anonymous
- Anonymous
- Anonymous
- Anonymous
The Switch Axe is also good for attacking the head because of it's long reach and its empowered axe mode having partbreaker built-in.
- Anonymous
I did around 20 runs to get that stupid armor, I got around 10 Gems but no Tenderplates. I have the feeling that this stupid Monster is laughing behind my back!
This thing has the eyes of someone who has been directly injecting "demon drug" into their skull
- Anonymous
- Anonymous
I think the official devs intended that but in the preview picture for shara armor set, male and female sets are paired with the other set, like in one picture its Alpha(M)+Beta(F) and in the other it's Beta(M)+Alpha(F). Not really a error though.
- Anonymous
- Anonymous
So I went into this with tigrex armor (around 720 armor) and water db. Took around 10 mins for the golem phase, 20 for the 2nd phase. Not hard at all. Tips: On 2nd phase, once she goes underground ala diablos style, FOLLOW her. Get behind her and you'll never have trouble with her world ending beam. keep hitting her front paws and watch out for the wing underswipe attack. (Really telegraphed). Other than that, just stick to her paws and this fight is no sweat. The Nergi fight before her was harder. Idk what all the salt is about lol.
- Anonymous
I've killed it once and will never do this again. What a mess of a fight
- Anonymous
Went into the story mission blind with a fire bow. Not hard, but it took like 40 minutes.
- Anonymous
every time i try to clutch on her head, Shara "wait that's illegal.
- Anonymous
when you finally get a tenderplate, "IT'S BEEN 3,000 YEARS."
Opinion of this fight tends to divide based on whether you main melee or ranged: if you're ranged you'll likely wonder what everyone is so mad about, and if you're melee you'll probably see this fight as a giant middle finger pointed directly at you and any enjoyment you got out of the game. Personally I found this fight to be a chore: not so much challenging or interesting as it was long and frustrating. Advice? I dunno, just make sure you have above 800 total armor so you can survive a hit from the Kamehameha beam, prioritize stun immunity/sheathe/superman dive, throw in gobble if you've got the space since it'll help you heal quickly, and use Farcaster as your reset button. Shara has less health than you think, so don't feel the need to go through the entire combo before dodging again.
- Anonymous
How is it possible for it to hit me while clutched to it's head with it's "beam attack" or even a "claw swipe" on the opposite side of its body? Trying to weaken/break its head, and it's not hard even that hard to kill, but farming gems and tenderplates is frustrating. What a garbage designed boss...
- Anonymous
An extremely easy boss for the climax of the game. My recommendation is use 3 steadfast jewels. Not getting stunned will make the fight smooth. His spirit bomb can be easily dodged by running the the edge of the area or just farcastering out.
Not the hardest fight in the game by far, but definitely the worst. Having a huge monster turn on a dime and constantly spam an instant activation one hit KO move over and over and over again is just objectively poor design and artificially difficult rather than fair and fun difficult. Idk how anybody can really argue that it's not. The "git gud," assholes of the world are really missing the point. One can overcome a challenge and also think the challenge was poorly designed and unfun, which this absolutely is. I failed the double rajang event quest several times and didn't get salty at all, because Rajang is a beautifully designed monster with a fun and fair moveset even though he's balls hard, but failing this even once is very annoying because this monster is garbage tier levels of design. It's the kind of hard like a mario rom hack asshole would be about, I.E. the wrong kind of hard.
- Anonymous
Honestly I agree. Not the hardest fight at all, but the worst designed. Nothing about it is fun, and having a giant monster that turns on a dime and spams a one hit KO move over and over that comes out faster than your react is just not good design. People defending are just wrong, imo. Git gud is not a defense for poor design. You can overcome a challenge and also think the challenge was bullshit, which this one is. I'd rather fight Rajang any day, even though he carts me more often.


Aquatic/Polar Mobility is super nice for this fight as it lets you run through the sandy areas without being slowed.
Only need to slot in a 1 cost deco if you have it
6
+10
-1